How to Structure a “Bespoke Process” Page That Justifies Premium Pricing
If you are a custom or bespoke jeweller, your website is likely making a critical, invisible mistake: it is trying to sell finished products instead of selling the process.
When a client lands on your website, they aren’t just looking for a piece of jewellery; they are looking for an experience. They are looking for a guide to help them translate an emotion, a memory, or a legacy into a physical object. If your website looks like a standard e-commerce catalogue—a grid of finished rings with a price tag and an “Add to Cart” button—you are immediately commoditising your work.
You are forcing the client to compare you on price against mass-market retailers. And in that arena, the bespoke jeweller always loses.
To command premium pricing, attract high-intent clients, and filter out price-shoppers, you must shift the narrative. You must build a “Bespoke Process” page that demystifies the journey, builds immense trust, and clearly articulates the value of your craftsmanship.
Here is the exact framework for structuring a custom jewellery design process page that converts browsers into booked consultations.
Why the “Process Narrative” is Your Strongest Sales Asset
Selling bespoke jewellery requires overcoming a massive barrier of trust. A client is about to hand over a significant amount of money for something that doesn’t exist yet.
They are worried about the final result. They are anxious about the cost. They are intimidated by the terminology (CAD, casting, inclusions, alloys).
A well-structured process page acts as a digital concierge. It pre-emptively answers their questions, validates their anxieties, and positions you as the authoritative expert. By breaking down the creation of a piece step-by-step, you achieve three critical things:
- You Justify the Investment: When a client sees the hours of sketching, the precision of the 3D modelling, and the meticulous hand-finishing involved, the price tag suddenly makes sense. They are no longer buying gold and stones; they are buying hundreds of hours of mastered skill.
- You Lower the Barrier to Entry: Demystifying the steps makes reaching out feel less intimidating. They know exactly what will happen after they submit that inquiry form.
- You Establish Authority: Explaining the how and why behind your methods proves your expertise before you ever jump on a consultation call.
The 5-Step Framework for a High-Converting Process Page
A process page should read like a story, guiding the user from their initial idea to the final, polished piece. Here is how to structure it.
Step 1: The Discovery & Ideation Phase
The Goal: Show the client that they are heard and that their story is the foundation of the piece.
What to Include:
- The Initial Consultation: Explain how you meet (in-person, Zoom, email). Emphasise that this is a zero-pressure environment.
- The Intake Process: What do you talk about? Mention that you discuss their lifestyle, their aesthetic preferences, the occasion, and their budget.
- Sourcing & Selection: If you source specific stones (like navigating the diamond markets or finding ethical sapphires), explain this here. Show that you do the heavy lifting to find the perfect centrepiece.
The Copywriting Angle: Focus on collaboration. Use phrases like, “We start by listening to your story,” or “Translating your vision into a wearable legacy.”
Step 2: The Design & Sketch Phase (Visualising the Concept)
The Goal: Prove your artistic capability and reassure the client that they have control over the final look.
What to Include:
- Hand Sketches vs. CAD: Explain your specific method. Do you start with pencil sketches? Do you move straight into 3D modeling?
- The Review Process: Crucially, explain how the client is involved. Tell them they will review the designs, request tweaks, and approve the final concept before anything is cast.
The Copywriting Angle: Focus on precision and collaboration. “We don’t move forward until the design is exactly what you envisioned.”
Step 3: The Engineering Phase (CAD and Wax Printing)
The Goal: Highlight the technical expertise required to ensure the piece isn’t just beautiful, but structurally sound and durable.
What to Include:
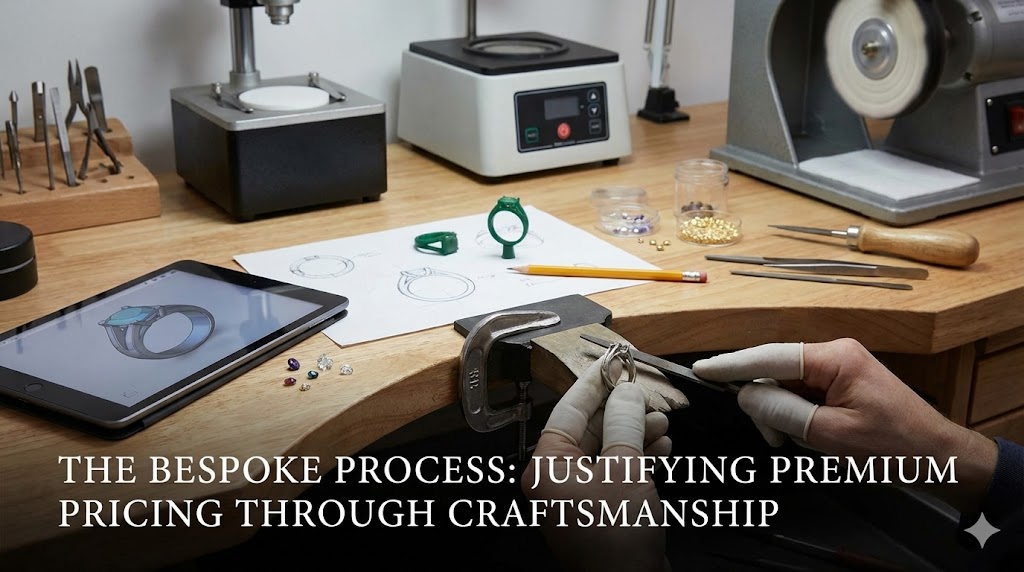
- The Tech: Briefly explain CAD (Computer-Aided Design) if you use it. Show a side-by-side comparison of a CAD render next to the finished ring.
- The Resin/Wax Model: Explain that the digital file is printed into a physical, to-scale wax or resin model.
- The Fitting: If you allow clients to try on the wax model to check the proportions and finger size, feature this heavily. It is a massive trust-builder.
The Copywriting Angle: Focus on structural integrity. “Designing a ring isn’t just about aesthetics; it’s about engineering a piece that will last a lifetime.”
Step 4: Casting, Setting, and Craftsmanship (The Alchemical Phase)
The Goal: This is where you justify the premium. Show the raw, physical labour and the mastery of the bench jeweller.
What to Include:
- The Metalwork: Describe the casting process (turning the wax into solid gold/platinum). Talk about the filing, the sanding, and the assembly of the components.
- The Setting: Highlight the precision required to set the stones securely under a microscope. This is where the risk and the skill are highest.
- The Polish: Explain the final stages of bringing the metal to a mirror finish.
The Copywriting Angle: Focus on mastery and time. “Our master setters work under microscopic magnification to ensure every stone is perfectly secured and aligned.”
Step 5: The Reveal and Aftercare
The Goal: Close the loop, create excitement, and outline the long-term relationship.
What to Include:
- The Presentation: How is the piece delivered? (Custom packaging, appraisal documents, certification).
- The Guarantee/Aftercare: What happens next? Detail your policies on resizing, annual cleaning, and maintenance. This reassures the client that you stand behind your work.
The Copywriting Angle: Focus on legacy. “The delivery is just the beginning of your piece’s story.”
3 Critical Elements to Embed Throughout the Page
To ensure this page actually converts, you must weave these three elements into the narrative:
1. High-Fidelity, “In-Progress” Imagery
Do not just show the finished product. Show a macro shot of a CAD render. Show a jeweler’s bench covered in tools and gold dust. Show the raw casting before it is polished. “Behind-the-scenes” imagery proves authenticity and visualises the labour involved.
2. Strategic Micro-Testimonials
Instead of dumping all your reviews on a single “Testimonial” page, embed relevant quotes within the process steps. Under the “Design” section, include a quote from a client saying, “They took my vague ideas and sketched exactly what I had in my head.” Under the “Reveal” section, add a quote saying, “Seeing the final piece took my breath away.”
3. Clear, Benefit-Driven Timelines
Uncertainty kills conversions. Be transparent about how long the process takes. If it takes 6-8 weeks from the initial consultation to the final delivery, state that clearly. It manages expectations and creates a sense of urgency for clients planning for a specific date (like a proposal or anniversary).
Stop Competing on Price. Start Competing on Process.
When you successfully articulate your bespoke process, you remove yourself from the commodity market. You are no longer selling a $10,000 ring; you are selling a personalized, expertly guided journey that culminates in a one-of-a-kind heirloom.
When clients understand the depth of the work, the premium pricing becomes the logical expectation, not a deterrent.
Need help structuring your custom process into a high-converting website? A beautiful portfolio isn’t enough; you need a site architecture engineered to capture high-value leads. Explore our Digital Strategy for Custom & Bespoke Jewelers to see how we build lead-first digital studios that turn browsers into booked consultations.